Classic Sourdough Bread Recipe: Simple, Timeless, Delicious
Have you ever wanted to bake a loaf of classic sourdough bread but felt overwhelmed by the process? Homemade sourdough bread can seem daunting, especially with all the steps and patience required.
I remember my very first time baking sourdough bread. After a month of waiting for my starter to be nice and bubbly, I was super excited to bake my first loaf. However, the results were not as rewarding as I expected. The bread turned out dense and flat, and I was unhappy with the results.
This comprehensive guide will walk you through a classic sourdough bread recipe with easy-to-follow steps.
Understanding Sourdough Bread
Sourdough bread uses natural yeast from the air, water, flour, and even your hands to rise and ferment. Unlike bread made with commercial yeast, sourdough bread has a unique flavor and texture that many prefer because of its characteristics and health benefits. There is a wide variety of sourdough bread recipes available, and understanding the baking process is essential to mastering them.
Due to the fermentation process, sourdough bread requires a longer fermentation time. There are several stages in the making of sourdough, including the initial mixing, autolyse (where the flour and water are mixed and left to rest), bulk fermentation, shaping, proofing, and finally baking. Each of these stages plays a crucial role in developing the bread’s distinctive taste and texture.

The Health Benefits of Sourdough Bread
One of the key benefits of sourdough bread is its digestibility. The long fermentation process breaks down gluten to some extent, making it easier for some people to digest compared to regular bread. Additionally, the natural fermentation process helps to increase the availability of nutrients in the bread, such as B vitamins, and minerals like iron, zinc, and magnesium.
Crafting the Perfect Sourdough Loaf
Baking bread, especially sourdough, involves patience and practice. Here are the essential steps to guide you through the process:
Creating and Maintaining Your Starter: A sourdough starter is a mixture of flour and water that captures wild yeast and bacteria from the environment. Feed it regularly to keep it active and ready for baking.
Mixing the Dough: Combine your starter with flour, water, and salt. Mix until all ingredients are well incorporated.
Autolyse: Let the mixture rest for about 30-60 minutes. This allows the flour to hydrate and begin the gluten development process.
Bulk Fermentation: Allow the dough to ferment at room temperature for several hours. I usually let the dough ferment for about 6-8 hours. During this time, perform a series of stretch and fold during the first 2 hours of the bulk fermentation. This will further strengthen the gluten network.
Shaping: Once the dough has fermented and increased in volume, shape it into a loaf. This step requires gentle handling to retain the air pockets formed during fermentation.
Proofing: Let the shaped dough proof for at least 8 hours in the refrigerator. This final rise enhances the flavor and texture of the bread.
Baking: Preheat your oven with a Dutch oven or baking stone inside. Transfer your proofed dough to the preheated vessel and bake until the crust is deeply golden and the loaf sounds hollow when tapped.
Tips for Success
Patience is Key: Sourdough baking is a slow process, but the results are worth the wait.
Consistent Feeding: Keep your starter healthy and active by feeding it regularly, especially if you bake often.
Temperature Control: Pay attention to the temperature of your kitchen, as it can affect fermentation times.
Experiment and Learn: Every batch of sourdough can teach you something new. Don’t be afraid to experiment with hydration levels, flour types, and proofing times.
The Sourdough Starter
A sourdough starter is a fermented mix of flour and water containing wild yeast and bacteria. You can make a sourdough starter from scratch or purchase one for convenience. To keep your starter alive, you need to feed it regularly, which involves discarding most of it and replenishing it with equal parts of flour and water. My Sourdough Starter: A Beginner’s Simple & Efficient 4-Step Guide has more information about how to start and maintain your own sourdough starter.
Essential Ingredients and Equipment
Equipment Needed
Scale or spoons and measuring cups
Large bowl
Dough scraper
Bowl covers or plastic wrap
Dutch oven or baking steel (if open baking)
Parchment paper
Banneton (or a 9″ bowl)
Cooling rack
Ingredients for a Classic Loaf of Sourdough Bread
Active sourdough starter
Bread flour
Water
Salt
Rice flour (optional)
Making Sourdough Bread
The classic sourdough bread recipe I am sharing with you is a 68% hydration dough. I use high-protein bread flour with an approximate protein percentage of 14%. For the best results when you bake sourdough bread, consider using a cast iron pot with a lid, as it retains heat well. Enamel pots are also a good option, but personal preference and experience will guide you to the best choice.
You can also opt to use a baking steel for open baking. This is by far my favorite way as it achieves a higher rise and I can fit more than two loaves of sourdough bread at a time. Plus, you get the bonus of seeing how your loaf of sourdough bread rises as it bakes!
Classic Sourdough Bread Recipe Instructions
Autolyse
30-60 before your starter is ready, combine water and flour in a large bowl until there are no dry bits of flour left. Cover it with a plastic cover or wrap and let it sit at room temperature until your starter is ready. This step has been a game-changer for me! I used to omit the autolyse, but I found that I had better and more consistent results when I mixed the flour and water first and let the flour hydrate.
Finish the Dough
Add the starter to the flour and water mix and perform a set of stretch and fold to incorporate the starter.
At this point, the starter will not be fully incorporated. That is OK! It will come together once we add the salt and continue with the stretch and fold sets.
Sprinkle the salt over the dough and add about 1 tablespoons of water to dissolve the salt slightly. Continue with more sets of stretch and folds or until the salt and starter are fully incorporated with the autolysed dough. Perform a coil fold to give the dough a nice round top.
Bulk Fermentation, Stretch, and Fold
Cover the bowl with a plastic cap or wrap and let it rest for 6-8 hours, performing a set of stretches and folds every 30 minutes for the first 2 hours.
After completing the rounds of stretch and fold, let the dough rest at room temperature for 2-4 more hours. The time will vary depending on your kitchen’s environment. You will know if the dough is ready to pre-shape once it looks bubbly and the edges slightly separate on the top from the sides of the bowl. I never let my dough completely double in size. I let it rise about 50-75%, but never more than that.
Pre-shape Sourdough Bread
Once the bulk fermentation is complete, lightly flour your working surface. Turn your dough on the working surface. Using a dough scraper, give the dough a quarter-round turn. Continue doing the quarter-round turns until the dough is round and taut. Be careful not to rip the dough!
Let the dough rest for about 10-15 minutes.
Shape
You will notice that, at this point, the pre-shaped dough might look slightly flat. That’s why we have to do a pre-shape and then perform a final shaping. Doing so will ensure your dough is nice and taut for the final rise and baking. If you are incorporating whole wheat flour into your sourdough, remember to adjust the water content to avoid a dry and dense dough. Here’s how to shape your sourdough for the best results:
- Final Shaping: Lightly flour your working surface and the top of the dough. Turn the bowl onto your working surface and let the dough release from the bowl. Shape the dough into your desired shape, typically a round boule or an oval batard. Use your hands to create tension on the surface of the dough by gently pulling it towards you and rotating it. This will help create a skin on the top that will hold its shape during the final rise and baking.
- Prepare for Proofing: Once shaped, place your dough into a proofing basket (banneton) that has been dusted with rice flour. If you don’t have a proofing basket, you can use a bowl lined with a clean, floured kitchen towel.
- Final Proofing: Cover the dough and let it proof at room temperature for about 1-2 hours, or place it in the refrigerator for overnight cold proof. The cold proofing helps develop a more complex flavor and makes the dough easier to score before baking.
Baking Your Sourdough Bread
- Preheat the Oven: Place your Dutch oven or baking stone in the oven and preheat it to 500°F (260°C) for at least 30 minutes.
- Scoring: Once the dough is proofed, carefully turn it out onto a piece of parchment paper. Using a sharp knife, bread lame, or razor blade, score the top of the dough with a few slashes. This allows the bread to expand properly in the oven.
- Baking: Transfer the dough on the parchment paper into the preheated Dutch oven. Add a few ice cubes to the Dutch oven, cover with the lid, and bake for 20 minutes. Remove the lid and bake for an additional 20-25 minutes, or until the crust is deeply golden brown and the bread sounds hollow when tapped on the bottom.
If using a baking steel, place a roasting pan on the bottom rack of your oven and add about 3 cups of water to it. Immediately close the oven and bake for 10 minutes at 500°F (260°C). After 10 minutes, lower the oven temperature to 475°F (245°C) and bake for an additional 15-20 minutes or until golden brown.
- Cooling: Remove the bread from the oven and let it cool completely on a wire rack before slicing. This step is crucial as it allows the bread to finish cooking internally and helps to set the crumb structure.
Enjoying Your Sourdough
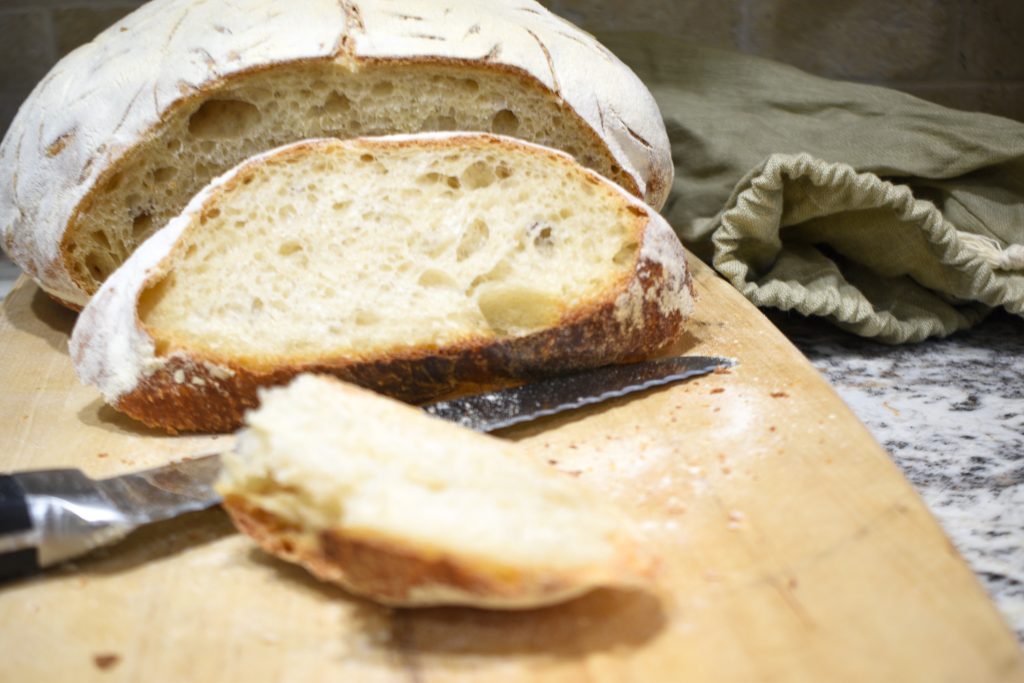
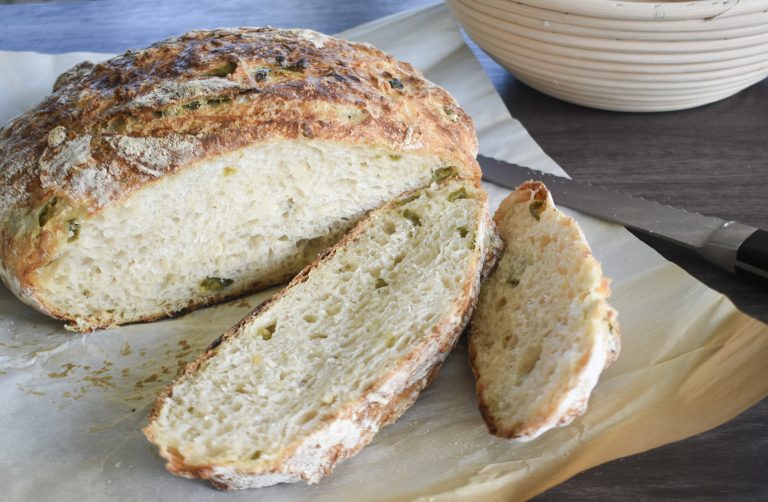
Once your bread is fully cooled, slice it open to reveal the beautiful crumb. Enjoy your sourdough bread fresh with butter, use it for sandwiches, or simply savor it on its own. Each bite is a testament to the time, patience, and care you’ve put into creating this classic loaf of sourdough bread.
Tips and Troubleshooting
Under-Fermentation: Under-fermented dough can result in a dense, heavy loaf of bread with a tight crumb. To ensure proper fermentation, make sure your starter is active and bubbly before using it. Look for visual signs like bubbles throughout the dough and a noticeable increase in volume. Give the dough enough time to rise but not so long that it collapses.
Poor Shaping: Improper shaping techniques can lead to uneven loaves and poor oven spring. Practice shaping your dough into a tight, uniform shape to build surface tension. This will help the dough hold its shape during the final rise and baking. Watching videos and practicing different shaping techniques can be incredibly helpful.
Tips for Success
Use a Thermometer: Temperature plays a crucial role in sourdough baking. Use a digital thermometer to check the water temperature when mixing the dough and the dough temperature during fermentation. Aim for a dough temperature of around 75°F (24°C) for optimal fermentation.
Adjust Hydration: Depending on the type of flour and the humidity in your kitchen, you may need to adjust the hydration level of your dough. If your dough feels too dry, add a little more water.
Maintain a Healthy Starter: A strong and active starter is the foundation of good sourdough bread. Feed your starter regularly and keep it at the right temperature to ensure it’s always ready to use. If your starter seems sluggish, give it a few extra feedings to boost its activity.
Practice Patience: Sourdough baking is a slow process that requires patience. Don’t rush the fermentation and proofing stages. Give the dough the time it needs to develop flavor and structure. Remember, good things come to those who wait!
Keep a Baking Journal: Documenting your sourdough baking experiences can help you track what works and what doesn’t. Note the hydration levels, fermentation times, and any adjustments you make. Over time, you’ll see patterns and learn how to achieve the best results in your specific environment.
Troubleshooting Common Issues
Flat or Dense Loaf: If your loaf turns out flat or dense, it could be due to over- or under-fermentation, weak starter, or improper shaping. Re-evaluate your fermentation times, ensure your starter is active, and practice your shaping techniques.
Gummy Crumb: A gummy or undercooked crumb usually indicates the bread was not baked long enough or at a high enough temperature. Make sure your oven is properly preheated and bake the bread until it reaches an internal temperature of 200-210°F (93-99°C).
Crust Too Hard: If the crust is too hard, try baking with steam in the oven to create a more tender crust. You can achieve this by placing a pan of water in the oven during the first 20 minutes of baking or using a Dutch oven to trap steam.
Uneven Holes in Crumb: Uneven holes in the crumb can result from improper mixing or shaping. Ensure the dough is well-mixed during the initial stages, and practice consistent shaping techniques to create an even crumb structure.
Sourdough Bread Baking Schedule
Creating a schedule for baking sourdough bread can help you manage your time effectively and ensure consistent results. Here’s a suggested timeline for a classic sourdough loaf:

Day 1: Preparing the Starter
Morning (8:00 AM): Feed your sourdough starter. Mix equal parts (by weight) of flour and water into your starter and let it sit at room temperature until it’s bubbly and active (about 4-6 hours).
Day 1: Autolyse and mixing
Afternoon (12:00 PM): Autolyse by combining the water and flour. Let it sit for 30-60 minutes.
Afternoon (1:00 PM): Add the active starter to the autolysed dough along with the salt and mix using the stretch and fold method. Rest for 30 minutes.Continue with stretch and folds every 30 minutes for 2 hours.
Day 1: Bulk Fermentation
Afternoon (1:00 PM – 7:00 PM): Let the dough rest, covered, at room temperature. Allow the dough to bulk ferment until it has risen about 50-75%.
Day 1: Pre-shaping and Shaping
Evening (7:00 PM): Turn the dough onto a lightly floured surface and pre-shape it into a round. Let it rest for 10-15 minutes.
Evening (7:15 PM): Perform the final shaping and place the dough into a proofing basket, seam side up. Cover and refrigerate for overnight cold proof (at least 8 hours).
Day 2: Baking
Morning (8:00 AM): Preheat your oven to 500°F (260°C) with a Dutch oven or baking stone inside. Take the dough out of the refrigerator. Score the top of the dough with a sharp knife or bread lame. Carefully transfer the dough to the preheated Dutch oven or baking stone. Cover with the lid if using a Dutch oven.
Bake the bread:
First 20 minutes: Bake with the lid on (if using a Dutch oven).
Next 20-25 minutes: Remove the lid and continue baking until the crust is deeply golden and the internal temperature reaches 200-210°F (93-99°C).
Remove the bread from the oven and let it cool completely on a wire rack before slicing. Enjoy your freshly baked sourdough bread on the day it’s made for optimal taste and texture.

Classic Sourdough Bread
Equipment
- 1 Large Bowl
- 1 Scale or measuring cups and spoons
- 1 Plastic wrap or cap
- 1 Banneton or bowl
- 1 Dutch oven or baking steel
Ingredients
Autolyse:
- 333 g water
- 490 g bread flour
Dough:
- 150 g active sourdough starter
- 10 g salt
Instructions
- Feed your sourdough starter. Mix equal parts (by weight) of flour and water into your starter and let it sit at room temperature until it’s bubbly and active (about 4-6 hours).
- Autolyse by combining the water and flour. Let it sit for 30-60 minutes.333 g water, 490 g bread flour
- Add the active starter to the autolysed dough along with the salt and mix using the stretch and fold method. Rest for 30 minutes.150 g active sourdough starter, 10 g salt
- Continue with stretch and folds every 30 minutes for 2 hours.
- Let the dough rest, covered, at room temperature. Allow the dough to bulk ferment until it has risen about 50-75%.
- Turn the dough onto a lightly floured surface and pre-shape it into a round. Let it rest for 10-15 minutes.
- Perform the final shaping and place the dough into a proofing basket, seam side up. Cover and refrigerate for overnight cold proof (at least 8 hours).
- Preheat your oven to 500°F (260°C) with a Dutch oven or baking stone inside. Take the dough out of the refrigerator. Score the top of the dough with a sharp knife or bread lame. Carefully transfer the dough to the preheated Dutch oven or baking stone. Cover with the lid if using a Dutch oven.
Bake the bread:
- First 20 minutes: Bake with the lid on (if using a Dutch oven).
- Next 20-25 minutes: Remove the lid and continue baking until the crust is deeply golden and the internal temperature reaches 200-210°F (93-99°C).
- Remove the bread from the oven and let it cool completely on a wire rack before slicing.
- Enjoy your freshly baked sourdough bread on the day it’s made for optimal taste and texture.
Notes
- This recipe yields 1 loaf of approximately 1,000 grams.
- For bread bowls, divide the dough into 2 before pre-shaping.
Nutrition
Notes:
Adjust the times based on your schedule and kitchen environment.
If you need more flexibility, you can extend the cold proofing period slightly to fit your schedule.
Keep an eye on your dough during each stage to ensure it’s progressing as expected.
Frequently Asked Questions (FAQ)
1. What is a sourdough starter?
A sourdough starter is a mixture of water and flour that captures wild yeast and bacteria from the environment. It serves as a natural leavening agent for sourdough bread, providing the unique flavor and texture that distinguishes sourdough from other types of bread.
2. How do I know if my sourdough starter is ready to use?
Your starter is ready to use when it is bubbly, has doubled in size, and passes the float test. To perform the float test, drop a small amount of starter into a glass of water; if it floats, it’s ready to be used in your dough.
3. What is autolyse and why is it important?
Autolyse is a process where flour and water are mixed and left to rest before adding the starter and salt. This step allows the flour to fully hydrate and begin gluten development, resulting in better dough structure and improved texture in the final bread.
4. Why do I need to perform stretch and folds during bulk fermentation?
Stretch and folds help develop the gluten structure in the dough, giving it strength and elasticity. This process also helps incorporate air, which is essential for creating an open crumb and good oven spring.
5. How long should I proof my dough?
Proofing times can vary based on the temperature of your kitchen and the activity of your starter. Generally, proofing at room temperature takes 1-2 hours, while an overnight cold proof in the refrigerator can take 12-16 hours. Look for signs like a slightly domed surface and a slight jiggle when the dough is gently shaken.
6. How do I score my dough and why is it necessary?
Scoring involves making slashes on the surface of the dough with a sharp knife or bread lame just before baking. This allows the bread to expand properly in the oven, preventing it from bursting unpredictably and giving it a beautiful, controlled rise.
7. What should I do if my bread turns out dense?
A dense loaf can result from under-fermentation, a weak starter, or insufficient gluten development. Ensure your starter is active and bubbly, give the dough enough time to ferment, and perform stretch and folds during bulk fermentation to develop gluten.
8. How can I achieve a crispy crust on my sourdough bread?
Baking with steam helps create a crispy crust. You can achieve this by using a Dutch oven or placing a pan of water in the oven during the first part of baking. Removing the lid or pan for the last part of baking allows the crust to brown and crisp up.
9. Can I freeze sourdough bread?
Yes, you can freeze sourdough bread. Once the bread is completely cooled, wrap it tightly in plastic wrap and then in aluminum foil or a freezer bag. To thaw, let it come to room temperature and reheat in a 350°F oven for 10-15 minutes to refresh the crust.
10. Why does my sourdough bread have an uneven crumb?
An uneven crumb can be due to improper mixing, shaping, or proofing. Make sure to mix the dough thoroughly, shape it carefully to create tension on the surface, and proof it adequately to allow for even expansion during baking.
These FAQs should help address common questions and issues encountered during sourdough bread baking. If you have more questions, feel free to reach out!